Showing posts with label winter. Show all posts

Monday, February 20, 2012

Making Snow Inside


We had snow for Halloween and snow for Thanksgiving however now, in the middle of February, we have no snow. It has been a crazy winter and my two are missing playing in the snow. So of course I searched pinterest and found this project. Today, we brought the snow inside and the Owl was thrilled.

For this super easy project all you'll need are these two ingredients: dish-washing detergent and water:


Add about 1/3 cup water and several squirts of dish washing soap to your food processor ..

Soon a white foam will appear. The longer you run your food processor the fuller and firmer the snow will become. Owl loved watching the mini blizzard appear right there in our kitchen!


Just add some trucks and of course a hardhat and you will have one happy preschooler.


Owl loved plowing the snow. It lasted for about 45 -6o minutes of play and then sadly, like the snow in our backyard, it was gone and all that was left was a puddle of water. However, while it lasted it brought some winter fun to my little guy.

Saturday, February 4, 2012

Ice Collage

These natural ice collages are a perfect winter craft. ( I found my inspiration here). I love when I can tie a craft in with an experience and these were a perfect extension of our walk in the woods last week. While walking in the woods we collected some fallen pine cones, pine boughs, and red berries. Due to the freezing rain we had recently the trails were covered with just these materials. Owl and I had fun on our search, looking for neat items to pick
up and collect.

Once home we took some disposable pie plates ( 2 for $1 at Dollar Tree).....


and arranged our findings in them.


Then we looped a piece of twin into the pan - this will serve as our hanger.


Owl poured water into each of our four containers. I love the Montessori based idea of practical life practice, especially on trays, but for me it makes perfect sense to incorporate these types of activities in authentic learning experiences.

Then we put them outside to freeze over night.

In the morning we popped them out of the containers ( which can be reused) and hung them from our front porch.


Not only do they look beautiful and sparkle in the sunlight, but they also are a reminder of a very special afternoon I spent with my little guy walking in the woods.

Sunday, January 8, 2012

Snowmen...No Snow Required!

We've been patiently waiting for snow here. The little ones are ready to be outside making a snowman to watch over our front lawn. On October 30th we were able to make this fella....


Crazy, right? Enough snow to make a snowman on Halloween Eve.

Now it is January and we barely have a dusting on the ground. The little ones want to make a snowman, but we have to make do with the paper variety. Luckily, pinterest came to our rescue with many snowman project ideas. Hopefully, these will holdover Owl and Sis until Mother Nature obliges and provides us with a good ole fashion snowstorm.


Egg Carton Snowmen
This craft was perfect due to its simplicity. Even Sassy Sis ( 21 months) could do this independently.


Materials:
Egg cartons
Cotton balls
Construction paper or Craft foam
Googly Eyes
Pom-poms or other embellishments

1. Cut one egg carton into four pieces - each piece with 3 cups. Trim down the sides.

2. Apply glue to the inside of each section of the carton and press in cotton balls.

3. Owl used a hole punch to make the dots for the mouths. ( I've noticed his hand strength needs work so this is a great activity for him!)

4. Embellish and decorate snowman!

Sissy is ALL about being independent these days. This was a perfect craft for her!


I loved that this craft not only ended in a seasonal decoration, but it also helped with some of the fine motor skills we're working on with Owl. This particular craft had him using the small hole puncher, my large craft puncher, and scissors as well as lacing with yarn! Perfect!


Materials:
1. 3 paper plates.
2. Construction Paper
3. Yarn

Love that the supply list is short and sweet!

1. Owl helped punch the holes around the top plate. Then he laced
yarn through the holes.

2. Using a 1.5 inch round craft punch he punched out eyes out of black construction paper and buttons out of scrapbook paper.

3. Glue on snowman's face, buttons, and hat.


4. Punch holes to connect each plate with string.

We decided to hang this on the door at the bottom of our staircase. Owl loves when his art work is on display at our home and proudly shows everyone whom enters his snowman!

Salt and Glue Snowman Art

Messy, but fun!
Found this idea here.

Materials:

1. Card stock
2. Glue
3. Salt
4. Embellishments

1. First, I drew the outline of a snowman on the cardstock.


2. Using the glue trace over the lines and fill in the sections of the snowman with glue.


Owl did great controlling the glue bottle and going over the lines. Squeezing the glue bottle is a great fine motor exercise with him and will increase his hand stability and strength.

Sissy need some help staying on the outline, but did a great job filling in the circles with her glue!

3. Sprinkle salt all over your glue outline.

Or in Sissy's case throw handfuls of salt all over the glue outline!


4. Let your snowman dry. Depending on how much salt you used it could take about 24 hours.

5. Glue on a nose ( pipe cleaner), eyes, and buttons for embellishment.


So there you go. Three ways you can make a snowman, no snow needed. Hopefully, snow will be on its way here soon. It doesn't seem like a New England winter without it!

Thursday, January 5, 2012

Ice Exploration

The weather has been COLD here. Freezing Cold.
Which means we've been staying inside more.
I decided it was time to take advantage of the cold and
break out some science experiments.

So we made ice.

Ice Exploration Science Experiment

Supplies:
Different sized paper/plastic cups
Water
VERY cold weather
Food coloring ( optional)
Little plastic figurines (optional)
Salt
Container

First, we practiced our pouring skills by filling the various cups
with water.


Then, for fun, we added food coloring and some plastic figurines ( from Dollar Tree)
to our cups of water.

While prepping our materials I had a conversation with OWL about ice. I wanted to introduce the concept of freezing. He understood that water turns to ice when there is cold!

After our cups were ready we brought them outside.

(Photo by OWL)

Side Note: There were more red solo cups on the rail. When my husband came
home he moved the cups off the railing because he said it looked like we were having a kegger with all the red cups on the rail!

We checked on the cups a few times before bedtime and then again in the morning.

Then the fun began...

After protecting my living room floor with a vinyl table cloth and several large towels we emptied the cups into a disposable roasting pan. OWL then began the quest to free the frozen plastic animals from the ice. He used his hammer and screwdriver to chisel away at the ice. Then we talked about salt and how it helps melt ice. The salt was applied in mass quantities.


OWL chiseled and hammered away. He noticed the ice turning back to water and understood the concept of melting.


OWL tried many tools to help him excavate the plastic animal figures from the ice. He concluded the plastic BBQ brush wasn't effective. Of course, it didn't stand a chance against the hammer!


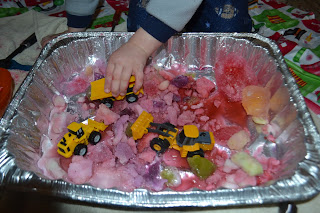
Once the plastic animals were found, the ice was chopped and melting so the construction equipment was brought out. Play continued with our very own sensory bin!


These toys are super for messy projects ( play-dough and painting) since they aren't expensive and can be easily washed.

Oliver loved this activity. It was perfect for a cold winter's day!