Sunday, January 29, 2012

Valentine's Place Mats


I've started pulling out our Valentine's Day decorations and Owl is all over decorating with them.
He loves putting up new decorations and loves it even
more when the decorations were made by him.
It wasn't long before he asked to make a heart project.

Considering it was Sunday and my husband was home I knew it needed to be a non-messy craft. When the glitter and paints come out my DH starts to twinge and shake at the thought of a mess.

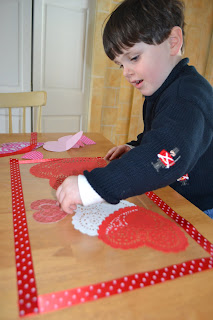
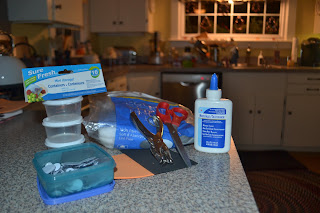
These contact paper place mats were the perfect project. Easy to prep which was good for me, little to no mess which would keep the DH calm. The best part was that I had everything we needed on hand. See, that stockpile of craft supplies does come in handy every so often!


Instructions:

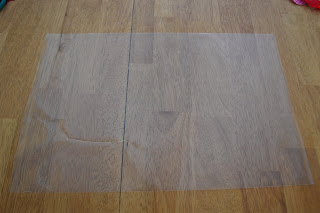
First you need to cut two pieces of contact paper - the size of your place mat.
Take the backing of the first piece and lay it sticky side up on your table.


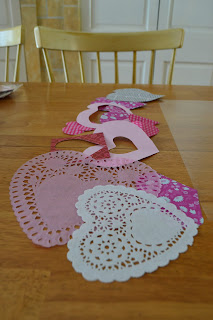
Then cut various size hearts out of paper. I used regular construction paper, scrapbook paper, newspaper, and heart shaped doilies.


I helped Owl cut ribbon to use as a border for our place mat. Do not put your ribbon right up to the edge of the contact paper. You need to have a border of contact paper exposed when you put on your top piece.


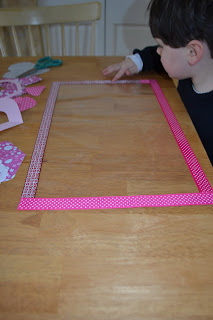
Then he pressed down the hearts where he liked them.


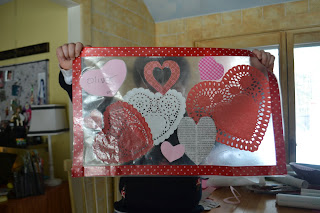
Once you have your hearts down you will peel the backing off of your second piece of contact paper and put the sticky side down, rubbing it until any air bubbles are out and it is all firmly stuck together.

Owl enjoyed making his so much that he suggested making one for Sassy Sis.
She'll be very happy when she wakes up from her nap to find out that her big brother has a special Valentine's gift for her.


Monday, January 23, 2012

3,2,1 Learning Numbers is Fun!


We've been focusing on knowing our numbers, 1-10.
Today we've practiced identifying the numerals 1-10 many ways.

Sand Paper Numbers

First we started with our new sandpaper numbers which I purchased from etsy.


Owl loves these. I love the tactical experience they provide for Owl. I model tracing the number with my index finger repeating the number aloud, then hand the number to Owl so he can do the same. When we first started number recognition we started with just 0-3, adding a few more numerals until we reached 0-10.

Number Puzzles

Owl is really into puzzles these days. We used #1-10 from The Learning Journey's Addition Cards. First, Owl made the match of numerals and pictures.


Then we put our matched pairs into numerical order.


Grid Game

Grid games are perfect for number recognition, 1:1 correspondence and fine motor work ( rolling of the dice). These can be used alone or as a game where two people each have their own grid. To use the grid you roll the dice, count out your manipulatives ( we used poker chips) and then place one manipulative over each picture. You play until your whole grid is covered. You can easily make your own grid with stickers. I found these ( to go along with our snowman theme) here.

Number Cards

The finished product...


I gathered 10 different styles of foam stickers, 55 in total. 10 of one kind, 9 of another and so on.

First Owl had to separate the kinds of foam stickers into piles.


After he chose which pile he wanted to work on first he counted the foam shapes to see how many there were. Then he went and found the matching number sheet.


Afterwards he stuck the foam stickers on the number sheet. Peeling the stickers is another great fine motor activity! These are so versatile. You can line them up on the floor in correct number order or string a clothes line and hang them up in numerical order. I'm looking forward to using this for some future activities. Owl always loves when we use materials he has made!

Kumon Writing Practice

I'm not a huge fan of workbooks or of worksheets however, there is a time and place for some written practice. My favorite type of workbook practice is KUMON. There materials are top-notch. We work on a couple pages at a time to reinforce our numbers as well as continue working on our prewriting and writing skills.

"The Kumon Method introduces learning concepts in an incremental, step-by-step approach, allowing children to master new skills easily and without anxiety or frustration."-Amazon.

Sunday, January 22, 2012

Preschool Book Club

We enjoy having friends over for a crafty play-date.
The craft always reflects the season, however starting now it will also be an extension of a story we will read. I suppose once a teacher always a teacher!

Owl decided it would be fun to read the story in front of the fireplace. He is LOVING the fireplace. I'm loving that my husband finally fixed it after living in our house for two years!

This week we read:
Source: Amazon

This story is great for little ones.
The funny story is written
in rhyme and the illustrations are bright and bold.

After our story we made these adorable marshmallow snowmen.
Besides having to remind the little ones that the marshmallows were for the craft and not for eating, they all were able to easily complete their snowman.

For instructions on the craft see original post here.

One mom even made these snowmen fruit snacks for us to enjoy. Aren't they adorable?

Find recipe here.

Owl is already asking when we'll have his friends over again for a story and craft.

Saturday, January 14, 2012

Smiling Snowman

As a former elementary classroom teacher I understand the importance of building schema, since schema and comprehension are directly related. Thus, the reason I'm constantly trying to expose my children to many different experiences. The best part of building schema is that you can do it without leaving your own home.

We read lots of picture books in our home - books that show different ways of life/experiences.

One of my favorite winter books is

Source: Amazon

It's hard to believe it is the 50th anniversary of this great picture book. I love that this book shows what a snow day is like in the city, especially since we live in a small town. I'm always surprised at what my little ones notice while reading books. Sometimes they latch onto details I barely notice. In this story it was the smiling snowmen the little boy made.

So we made smiling snowmen.........

Owl was very proud of his snowman that he completed all by himself.


And Sassy Sis' snowgirl! ( Love all of the sparkly buttons she had to include!)


Full tutorial of how to make cotton ball snowman found here.

Friday, January 13, 2012

Letter S Activities ( Part One)

This week we've been focusing on the letter S with many S is for snowman activities. I like to incorporate as many different activities as I can in our letter studies.

Confessions of a Homeschooler is one of my favorite blogs to follow and where I found these resources. At the beginning of the month I try to organize all of my materials ( a post to follow). I decide on our letters/themes, find and print resources, laminate them and then after a night or two focused on prepping school work, most of the work is done for the month.

Owl has been enjoying his S activities even during a week of having the Stomach bug.....

Sorting uppercase and lowercase S.


S is for Snowman Puzzle
( Now Owl makes these on his own however, you can print out two of these - cut one into pieces and keep one whole to use as a matching game.)


Now sometimes you have to wear your Santa jammies and your ski helmet while doing your school work.....I mean we are studying the letter "S" right?

Using our do-a-dots Owl marked each "s" on sheet.


Ordering snowman from largest to smallest and smallest to largest.
( When Owl was younger I would only give him 3-4 cards at a time)


Color match sheet - identifying colors and matching.


The resources you can find online for preschool printables is AMAZING! Check out my Pinterest board: Preschool Printables for tons of free materials you can print off at home!


Setting the Table

Growing independence in my children is important.
We strive on responsibility and routine in this house.
Today, after coming in from outside, Owl put his snow boots on our boot tray, his hat and mittens in our hat basket and his coat in the closet. OK, it wasn't on a hanger, but still it was in the correct closet and this all happened while I was in another room changing Sassy Sis. Now if I could only get my husband to put his things away like that!

To help Owl help during meal times I recently purchased these:


Owl loved these. Every night he sets his own place at the table and couldn't be more proud. I couldn't be happier that I have a helper!


Tonight we had our weekly dinner with his best friend. Owl proudly set up his place as well as his BF's place. It really was very cute seeing him getting everything ready for his friend at the dinner table.

Setting his place setting tonight.....hmmm, maybe doing the dishes tomorrow night?

Thursday, January 12, 2012

Snowman Blocks

We've had a low key week here.
In fact this picture pretty much sums it up....


Owl caught the stomach bug that is working its way around our parts.
It was a week of staying in jammies all day and not straying far from the fire.

Luckily we were still able to do some learning activities.
Both of my little ones love listening to stories. So stories and art activities it was.

We've been focusing on the letter S this past week. Luckily, as a former classroom teacher I have a book or two (or a basement full) of picture books. Today we read....


Owl set up our classroom for the day.
Three pillows one each for Owl, Sassy Sis, and me......


After reading the story we made our own snowmen - these adorable snowman blocks.
( These were inspired by an idea found here)


Not only are these cute, they are also super simple. Sassy Sis need limited help with these.

Materials:
3 small storage containers - ( I found mine at Dollar Tree)
Googly eyes
Cotton balls
Glue
Black and orange foam or construction paper
Hole punch and scissors


Unfortunately, I don't have any action shots of putting these together. I'm still learning to work with both my 21 month old and 3 year old while using my camera all at the same time!! But the steps are easy......

1. Fill three containers with cotton balls.
2. On one container glue two googly eyes and a nose.
3. Use the hole punch ( great fine motor activity) to make buttons from black foam.
4. Glue buttons onto two of the containers.
5. Enjoy!

Sunday, January 8, 2012

Snowmen...No Snow Required!

We've been patiently waiting for snow here. The little ones are ready to be outside making a snowman to watch over our front lawn. On October 30th we were able to make this fella....


Crazy, right? Enough snow to make a snowman on Halloween Eve.

Now it is January and we barely have a dusting on the ground. The little ones want to make a snowman, but we have to make do with the paper variety. Luckily, pinterest came to our rescue with many snowman project ideas. Hopefully, these will holdover Owl and Sis until Mother Nature obliges and provides us with a good ole fashion snowstorm.


Egg Carton Snowmen
This craft was perfect due to its simplicity. Even Sassy Sis ( 21 months) could do this independently.


Materials:
Egg cartons
Cotton balls
Construction paper or Craft foam
Googly Eyes
Pom-poms or other embellishments

1. Cut one egg carton into four pieces - each piece with 3 cups. Trim down the sides.

2. Apply glue to the inside of each section of the carton and press in cotton balls.

3. Owl used a hole punch to make the dots for the mouths. ( I've noticed his hand strength needs work so this is a great activity for him!)

4. Embellish and decorate snowman!

Sissy is ALL about being independent these days. This was a perfect craft for her!


I loved that this craft not only ended in a seasonal decoration, but it also helped with some of the fine motor skills we're working on with Owl. This particular craft had him using the small hole puncher, my large craft puncher, and scissors as well as lacing with yarn! Perfect!


Materials:
1. 3 paper plates.
2. Construction Paper
3. Yarn

Love that the supply list is short and sweet!

1. Owl helped punch the holes around the top plate. Then he laced
yarn through the holes.

2. Using a 1.5 inch round craft punch he punched out eyes out of black construction paper and buttons out of scrapbook paper.

3. Glue on snowman's face, buttons, and hat.


4. Punch holes to connect each plate with string.

We decided to hang this on the door at the bottom of our staircase. Owl loves when his art work is on display at our home and proudly shows everyone whom enters his snowman!

Salt and Glue Snowman Art

Messy, but fun!
Found this idea here.

Materials:

1. Card stock
2. Glue
3. Salt
4. Embellishments

1. First, I drew the outline of a snowman on the cardstock.


2. Using the glue trace over the lines and fill in the sections of the snowman with glue.


Owl did great controlling the glue bottle and going over the lines. Squeezing the glue bottle is a great fine motor exercise with him and will increase his hand stability and strength.

Sissy need some help staying on the outline, but did a great job filling in the circles with her glue!

3. Sprinkle salt all over your glue outline.

Or in Sissy's case throw handfuls of salt all over the glue outline!


4. Let your snowman dry. Depending on how much salt you used it could take about 24 hours.

5. Glue on a nose ( pipe cleaner), eyes, and buttons for embellishment.


So there you go. Three ways you can make a snowman, no snow needed. Hopefully, snow will be on its way here soon. It doesn't seem like a New England winter without it!

For the Birds

Owl has been under the weather the last few days with the stomach flu so we've been laying low. I've been trying to find quiet & simple activities to do with him while we've been stuck indoors.

Thanks to the world wide web it was easy to find something that
was seasonally appropriate, fun and simple.


Pipe Cleaner Bird Feeders
( I found this project idea here.)


Supplies:

Pipe Cleaners
Cheerios ( or similar round cereal)
Yarn or String ( to hang feeders)

1. To start make a loop on one end of your pipe cleaner. This will be the bottom of the feeder.


2. Then start stringing the cheerios onto the pipe cleaner.


Once Owl figured out to put the pipe cleaner through the cheerio and then to push them down the cleaner it actually went pretty easy. Once you get to the end of the pipe cleaner just loop up the bottom and twist.


I tried to help Sassy Sis make one but....


All she seemed interested in doing was eating the Cheerios!


After we had a few feeders made we headed outdoors to hang them on a crab apple tree in our backyard.


Now let's hope the birds find them soon!

Friday, January 6, 2012

Let's Build!

My husband made this fabulous work bench for Owl for Christmas
It has been a huge hit! Now of course hubby has some GRAND ideas on what will be built on this bench while I need simple ideas to do with Owl.


Luckily, I found some great wooden toy kits from Montgomery Schoolhouse. The set we chose had four different vehicles in it. Today Owl decided to work on the train. These are perfect for little hands since the holes are predrilled and the pegs can easily be tapped into place.

With his glasses on ( safety first always!) he went right to work.


The assembled train...


Of course, we needed to spruce it up a bit so out came the paint.
Owl was VERY serious about his color choices and where each color went on the train.

( Yes, he is still in his jammies....it has just been one of those days!)


Owl was pretty excited about his finished product, especially because he did it by himself - which is really important these days!